How to Build Your Very First Airship
September 20th, 2020[Current as of Nov. 12, 2022]
I found that most of the existing guides for airships focus on what to do after you’ve created your first airship, and they pretty much skip or gloss over the “beginner” stuff. Here are the detailed instructions:
[NOTE #1: As of patch 5.2, the light party requirement was removed and workshop projects may be advanced by a single person.]
[NOTE #2: Submersibles are now the favored method of workshop voyages. Airships are considered outdated content and have not been updated for some time. The process for creating a submersible is pretty much identical, but using a dive credit instead of a flight credit.]
Step 1: Acquire a Free Company Workshop
Airships can only be created/managed via a workshop in an estate owned by a free company.
Step 2: Build the Components
Enter the workshop and interact with the Fabrication Station. In the menu, select View Company Crafting Log. (Note that despite the name, this is not a log of what you’ve crafted; rather, it lists the available schematics for what you can craft.) Click the ship icon in the upper left. You will see something like this:
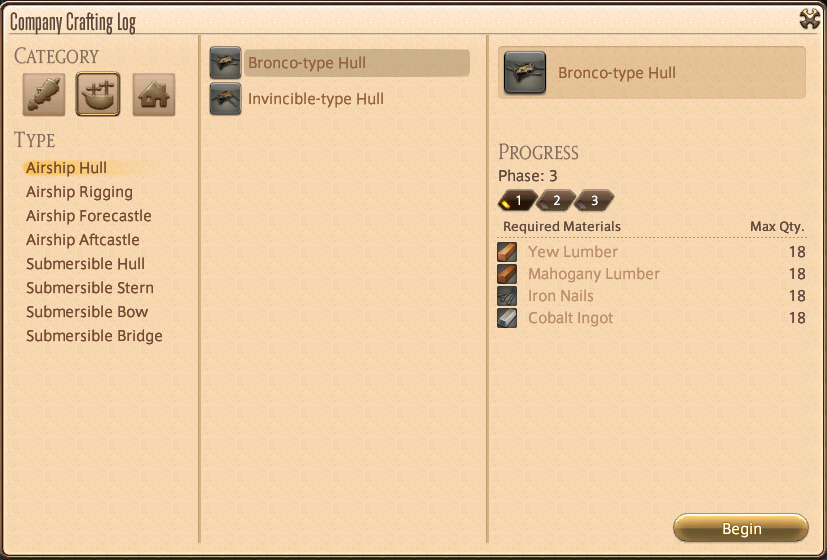
You must build one of each of the four airship parts: hull, rigging, forecastle, and aftercastle. At the entry level, there will only be one version available for each part, the Bronco-type.
Step 2a: How to Build a Single Component
Once you select a component and click the Begin button, the Fabrication Station menu will include an option to Contribute Materials. Each part has three contribution phases.
(click to display)
Here is a sample contribution screen:
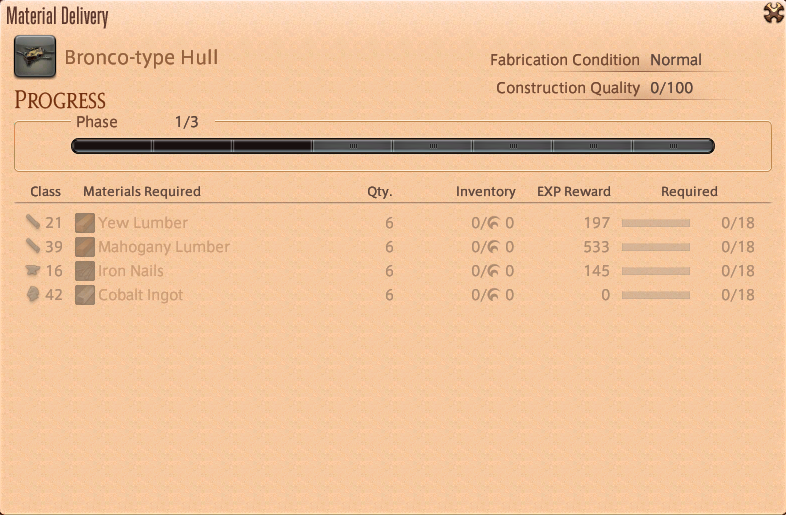
Some points to keep in mind:
- The source of the mats is immaterial. You can craft them, purchase them, steal them, whatever.
- There is a restriction on who can officially contribute the mats. In the example above, only a level 21+ Carpenter can contribute the Yew Lumber, and only a level 42+ Armorer can contribute the Cobalt Ingots. The icon and number at the far left of each row indicate who can contribute that item.
The mats required for an airship are substantial. Purchasing them is beyond the means of most individuals, and even crafting them requires significant resources. This is best done as a group project.
(click to display)
Once all the mats have been contributed, you are ready to advance to the next phase. This will require a group of four people, each configured as a crafter. The professions and levels don’t seem to matter, but you can’t finish the phase without a group of four crafters.
When the entire group is inside the workshop, interact with the Fabrication Station and choose the option to complete the project.
(click to display)
Once phase 1 is complete, repeat these procedures for phases 2 and 3. At the end of phase 3, you will get the option to put the finished component into your inventory.
Then start work on the next component, until you’ve completed all four.
(click to display)
Step 3: Register the Airship
Once you’ve completed all four of the components, you are ready to activate your airship.
First, visit the Resident Caretaker (there’s one in each residential district) and purchase a Flight Credit.
With the four components and the Flight Credit in your inventory, interact with the workshop’s Voyage Control Panel. Select Airship Management, then Outfit and Register an Airship. Once this is all done, your airship is complete.
Step 4: Enjoy!
You can now send your airship on missions via the Voyage Control Panel.
